

|
|
|
Contents
Entering differential equations
Function referenceThe following functions are available for use in expressions:
Mathematical constant reference
Operator referenceIn addition to the ordinary arithmetical operators +, -, *, /, the following operators are available for use in expressions:
Plotting solutions for selected initial conditionsClick your mouse in the canvas area to select an initial condition. A solution passing through the indicated initial condition will be plotted. You can also select the initial condition precisely by typing in values of x and y. This method is described in this section. Note: If there are more variables than 2, only two variables will be set based on the position of the mouse. The remaining variables will be set to 0. Choosing abscissa and ordinate of the plotIf the number of variables is greater than 2 (including the independent variable) then you may select the variables that will be used as the abscissa and ordinate of the plot. This is done by pressing two choice buttons placed along the left and bottom edge of the plot and selecting one of the list of all variables.Viewing solution tablesThe applet tabulates numerical solutions of the differential equations. You can view tabulated values for each initial conditions in a window by clicking on the button labelled "Show table". A window entitled "Solution table" will pop up with all numerically generated solutions, in a form resembling tables in standard textbooks on numerical methods. One can use Cut-And-Paste to copy these tables into a text editor or word processor. The applet generates a solution table every time it recalculates the solution. Old solution tables can be erased by pressing the "Clear" button of the table window. Setting ranges of variablesThese are entered into areas labeled as "Min. x", "Max. x", "Min. y" and "Max. y" etc. They are not used in calculations, until they are entered by either pressing the Return key, or by pressing the "Submit All" button. Setting the sizes of the gridThe sizes of the grid in the x- and y- and other directions are entered in areas marked as "Num. of segs" . They become effective upon either hitting the Return key (one item at a time) or by pressing the "Submit All" button, which updates all input related to entering the formula for dy/dx, the ranges and the number of grid intervals. Zooming into a regionThe right mouse button, on machines with 2 and 3 mouse buttons, or pressing the mouse button while the META key is depressed on machines with a single mouse button, will initiate a selection of a rectangle in the canvas. By dragging the mouse, the rectangular region is selected. When the mouse button is released, the range of the two coordinates is reduced to the selected rectangle. The zoom operation can be undone by pressing middle mouse button on system with three mouse buttons (or where the "wheel" can be used as middle mouse button) or by pressing the ALT key simultaneously with the mouse button.Display controls
Adding initial conditionsThe Applet maintains a list of initial conditions whose solutions will be plotted. You can:
Displaying tables of solutionsAll solutions displayed by the applet can be tabulated by pressing the "Show table" button in the initial condition entry group of buttons. Tables are displayed in a separate window. The table can be edited or copied into another application (e.g. text editor). This is achieved by first selecting the data to be copied (typically with a mouse) and then with the usual Control-C (Cut) and Control-V (Paste) key combination, or other system-specific Cut/Paste keys. The table data can also be printed directly from the applet by selecting "Pring" from the "File" menu. Further necessary information on printing from the applet is contained in this section. Printing from the AppletThe best general advice to avoid problems with printing (due to various bugs in major browsers and Java implementations) is to accept the certificate. The dialog to accept the certificate should pop up automatically when the page containing the applet is loaded for the first time. Another method primarily geared towards older Netscape browsers, is given here. It is possible to print without accepting the certificate, but some browsers will hang during the process.The page containing the Applet can be printed with all major browsers. However, there are some browser peculiarities. The problem is especially aggravating with Microsoft Internet Explorer, because the applet window is reset to its original state (i.e, your data is erased ):- ) before printing. Thus, in order to print, manipulating the security settings of the browser is required, or downloading a certificate file, which certifies the applet's authenticity. Unfortunately, the number of various browser version combinations and strategies is too numerous to discuss in detail. The included HTML files should take care of making the choice for various Netscape and Internet Explorer versions. The good news is that for versions 6.0+ of the two major browsers the only required action to print is accepting the certificate. Other strategies are explained below. Microsoft Internet Explorer 6.0-The default security settings do not allow unsigned applets to print. In order to print from the applet in Internet Explorer 5.5 you should allow the applet Web server (i.e. the Web server from which you downloaded this applet) to print. (This is not necessary if you are running the Applet locally as described in this section.) This is done as follows:
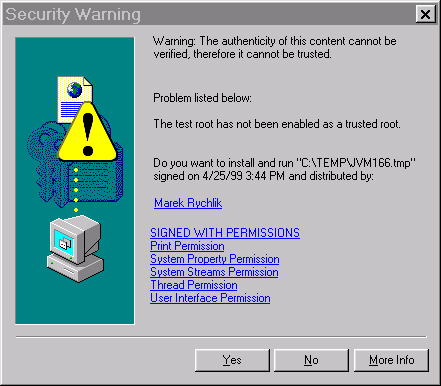
If you simply use the browsers "Print" button to print the version of the Applet embedded into the Web page, Internet Explorer will initialize the Applet before printing, and thus any changes, initial conditions, etc. will be lost. Therefore you must use the built-in "Print" button of the Applet, or the "Print" from the "File" menu of the Applets's window if running the Applet in a separate frame. You must also accept my security certificate when the Applet loads first by pressing OK when this dialog pops up. NetscapeNetscape up to version 4.79 will correctly print the Applet embedded into the Web page. Thus, you should use the embedded version. Unfortunately, the embedded Applet cannot be resized without editing the containing Web page. In order to enable printing using the "Print" button or the "Print" menu item in the "File menu" you should
Netscape 6.0 and MozillaThe applet should print with these browsers after accepting the certificate. The dialogue to do so will pop up automatically.AppletviewersYou can also print the Applet using Sun's appletviewer. Microsoft viewer JView does not allow printing. Editing HTMLAnother approach to printing is by editing the Applet's page with a text editor to enter the Applet parameters directly. Just edit the Applet's Web page with your favorite HTML editor or a text editor (my preferred way). Detaching the Applet frame from the browser windowOften you will find it convenient to detach the applet frame by pressing the "Frame" button. The Applet will run in a separate frame which will behave nearly like an application that you installed on your computer. Most importantly, you will be able to resize the window, even to cover the entire screen, and to use additional applet features accessible through the menu system.Saving and Loading JOde dataIn order to save the applet data (the formulas you typed in, the initial conditions, algorithms settings etc.) follow this procedure:
In order to load the applet from the file you just created, follow these steps:
ErrorsThese are typically generated by typing in an expression (see section on entering differential equations) which does not conform to the syntax rules of the Applet. The most recent error message appears in the box labeled "Last error". It will hopefully identify the problem by pointing to the column in which the first error occurs. If not, by pressing the button labelled "Show All Errors" all error messages can be examined and used to correct the problem. Advanced Topic: Downloading and running the Applet locallyYou can download
java -classpath directory_prefix/(or\)JOdeApplet.jar com.rychlik.jode.JOde "dimension=2" "autonomous=true" ...With the newer versions of Java you will be able to start the applet by executing the jar: java -jar JOdeApplet.jar "dimension=2" "autonomous=true" ...You can configure the applet by using several "parameter=value" options. All optiona are described in the parameters section. For instance "dimension=2" and "autonomous=2" set the number of differential equations to 2, and the equations are autonomous, i.e. time independent, and thus there is no need to display the independent variable axis. Advanced Topic: Controlling the Applet from HTML with parametersAll settings of the Applet can be set in the containing HTML document by passing parameters to the Applet. Currently, the applet recognizes these parameters, corresponding closely to the quantities which can be set from the graphical user interface (GUI). Advanced Topic: Precedence of operatorsThe precedence of operators closely resembles that of C or Java. The following table lists operators according to precedence, highest precedence first:
Advanced Topic: User-defined functions and flow-control statementsUser-defined functionsThe applet supports user defined functions, conditionals and flow-control. They may be defined in equation #0 or in any other equation. For instance,C=7; function f(x, y) = x + y + C defines a function which, when called with two arguments, returns their sum plus 7. It is worth noting that every statement of the JOde language is an expression. Function definition expression above returns a value of 0 when evaluated. The function is defined as a side effect.Semi-colonSemi-colon (;) is used as a separator in expressions. The resulting sequence of expressions is evaluated in order and the value of the last espression is returned. For examplex=1; y=2; x+y is an expression whose value is 3.ConditionalsJOde language supports the "if" statement. For instance, the following expressionx=2; if(x<3) 7 else 1 returns 7.LoopsJOde language supports the "while" statement. If the body of the while loop is not evaluated, the value returned is 0. Otherwise, the value is that of the last evaluation of the body. For instance,x=1; while(x<10) x=x+2 evaluates to 11. JOde supports " continue" and "break" statements in a way similar to C and Java. However, "continue" and "break" with no argument causes the value of the entire loop to be 0. If given an argument to " break", the entire loop evaluates to that argument. If "continue" is called with an argument, and the next test evaluates to false (i.e. 0.0) then the value of the entire loop will be the value given as an argument to "continue". Thusx=1; while(x<10) x=x+2; if(x==5) break x returns 5 andx=1; while(x<10) x=x+2; if(x==5) break return 0. In the following example:x=1; while(x<2) if(x==1) x=3; continue 7; 5 the value of the expression is 7. The semi-colon has very low precedence, and thus in the following examplex=1; while(x<2) if(x==1) x=3; continue (7; 5) the return value is 5 because of the explicit parenthesis.Advanced Topic: Documentation auto-generated by Javadoc utilityThis software is written in Java, of course. The documentation of a Java program is typically generated as HTML with the help of Javadoc. For those interested in the architecture of our program, here it is. Advanced Topic: The file format used by JOde "Save" commandThe files saved by JOde are in the generic format produces by object serialization (Serialization API). It is customary to use the ".ser" extension for these files, and we follow this convention. The saved files will be compatible with future minor revisions of the applet. A major revision may make the saved applets obsolete within a few years. Therefore, if a substantial amount of work was put into a given ODE example, the compatible version of the software (i.e. the file jode.zip) should be kept around. Recent Changes
Enjoy, Marek Rychlik ([email protected]) |
This page last modified Sun Sep 12 12:32:37 2004
Questions? Comments? Please send feedback to jason howald


